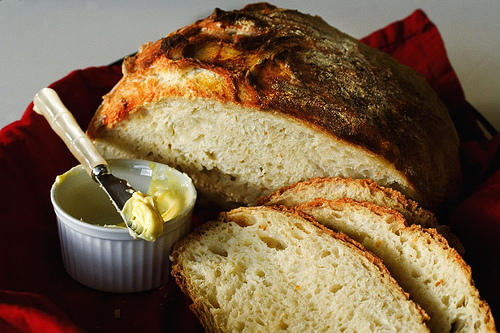
These rustic olive- and herb-flecked loaves are light-textured, flavorful, aromatic and crisp on top. They are a fine accompaniment to many hearty soups and stews. To simplify preparations, kneading is skipped and the gluten is developed by beating the dough with an electric mixer. Although the recipe calls for regular active dry yeast, a quick-rise or rapid-rise yeast may be substituted by slightly reducing the total amount used; the rising times may be a little shorter than for regular yeast. Recipe by Nancy Baggett for EatingWell.”
Ingredients
1½ tablespoons (about 2 packets) active dry yeast, or 1 tablespoon quick-rising yeast
⅔ cup lukewarm water, plus 2½ cups hot (110-115°) water
3½ cups all-purpose flour
2½ tablespoons flavorful olive oil, plus more for brushing
3 tablespoons sugar
3 tablespoons finely chopped fresh chives, or 2 teaspoons dried
1¼ teaspoons (generous) dried oregano and dried thyme leaves, or 3½ tablespoons finely minced fresh rosemary leaves
2¼ teaspoons salt
3¼ cups whole-wheat flour or white whole-wheat flour, (see Tip), plus a little more for dusting
⅔ cup well-drained, pitted and finely chopped Nicoise, Kalamata or other very flavorful brined black olives
Directions
1In a 1-cup measure, sprinkle yeast over ⅔ cup lukewarm water. Let stand, stirring occasionally, until the yeast dissolves.
2Place all-purpose flour, oil, sugar, chives, oregano and thyme (or rosemary) and salt in a large mixing bowl. Beat in the 2½ cups hot water with an electric mixer on low speed (using a paddle attachment if possible) until well blended and smooth. Slowly beat in the yeast mixture until evenly incorporated. Gradually raise the speed to medium (or almost to the point the mixture begins to splatter), and beat for 4 minutes if using a heavy-duty stand mixer or 5 minutes if using a hand mixer.
3Using a large wooden spoon, vigorously stir whole-wheat flour and olives into the dough until evenly incorporated; it’s all right if the dough is slightly sticky and wet. Turn out the dough into a very large lightly oiled bowl. Lightly brush the top of the dough with olive oil until evenly covered. Tightly cover the bowl with plastic wrap and set in a warm spot (see Tip) until the dough doubles in bulk, 50 minutes to 1 hour.
4Generously coat 2 round 1½- to 2-quart (6- to 8-cup capacity) ovenproof casseroles or souffle dishes with cooking spray. Coat your hand with cooking spray; press down the dough in the bowl, then divide it between the prepared baking dishes. Drizzle a little olive oil over the top of each; with your fingertips, smooth out the dough and evenly brush it with the oil. Sprinkle each loaf with about 1 tablespoon whole-wheat flour until evenly coated. Loosely cover the dishes with plastic wrap. Set in a warm spot until the dough rises to the plastic wrap, 45 minutes to 1½ hours (depending on the temperature of your room).
5Remove the plastic wrap; let the dough rise until it’s about ¼ to ½ inch above the rims, 15 to 30 minutes. Meanwhile, preheat the oven
6to 400°F.
7Transfer the loaves to the middle of the oven; avoid jarring, as they may deflate. Bake until the tops are nicely browned, about 30 minutes. Remove the loaves from the dishes (run a table knife around the edge to loosen if necessary), place top-side up on a baking sheet, and continue baking until they are well browned on top and sound hollow when tapped on the bottom, 10 to 15 minutes more. Let the loaves cool for at least 15 minutes before serving. Cut into thick wedges.
Make Ahead Tip: Store cooled loaves, tightly wrapped, for 3 days at room temperature or freeze for up to 2 weeks. If frozen, thaw completely and, if desired, warm (wrapped in foil) at 350°F before serving.
Tips: White whole-wheat flour, made from a special variety of white wheat, is light in color and flavor but has the same nutritional properties as regular whole-wheat flour. Two companies that distribute the flour nationally are King Arthur Flour (kingarthurflour.com) and Bob’s Red Mill (bobsredmill.com).
Create your own warm, moist, draft-free environment for raising bread dough by microwaving ½ cup water in a 1-cup glass measure just to boiling. Set the water in one corner of the microwave. Set the bowl of dough on the other side and close the door. The heat from the water will keep the interior warm. After the first rising, reheat the water, then put in the two loaves and proceed with the second (brief) rising.
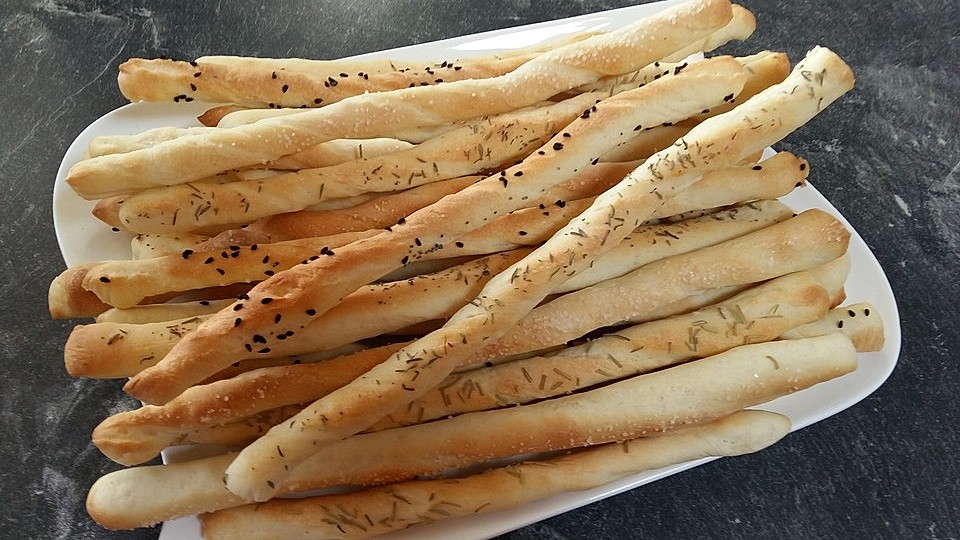
Long, crispy, thin breadsticks like these grissini are laid right on the tablecloth at many Piedmontese restaurants. ”
Ingredients
1¼ cups lukewarm water
2 teaspoons sugar
1 tablespoon active dry yeast
1¾ cups whole-wheat flour, preferably white-whole wheat (see Shopping Tip)
1¾-2 cups all-purpose flour, plus more for dusting
4 tablespoons extra-virgin olive oil, divided
1½ teaspoons coarse salt, divided
Directions
1Stir water and sugar in a large bowl until the sugar is dissolved. Add yeast and let stand for 10 minutes; it should bubble (if it doesn’t, throw it out and start over with fresh yeast).
2Add whole-wheat flour, 1¾ cups all-purpose flour, 2 tablespoons oil and 1 teaspoon salt. Mix with a wooden spoon and, eventually, your hands until combined. Add up to ¼ cup more all-purpose flour if the dough seems sticky.
3Turn the dough out onto a lightly floured surface and knead until it is smooth and elastic, at least 5 minutes.
4Lightly oil a clean large bowl. Gather the dough into a ball; place it in the bowl and turn to coat. Cover with a clean kitchen towel and set aside in a warm, draft-free place until doubled in size, 1 to 1½ hours.
5Position racks in the upper and lower thirds of oven; preheat to 375°F. Coat 2 large baking sheets with cooking spray.
6Cut the dough into 12 equal pieces. Stretch and roll each piece to about 24 inches long and approximately ⅜ inch thick. Cut each piece in half to make 2 dozen 12-inch-long breadsticks. Place about ½ inch apart on the prepared baking sheets. Brush both sides of the breadsticks with the remaining 2 tablespoons oil and sprinkle with the remaining ½ teaspoon salt.
7Bake the breadsticks for 15 minutes. Gently turn each breadstick over. Continue baking until crisp and golden brown, 15 to 20 minutes more.
Make Ahead Tip: Tightly wrap cooled breadsticks in plastic wrap and keep for up to 5 days.
Shopping tip: White whole-wheat flour, made from a special variety of white wheat, is light in color and flavor but has the same nutritional properties as regular whole-wheat flour. Find it in large supermarkets or online from kingarthurflour.com.
Easy cleanup: Recipes that require cooking spray can leave behind a sticky residue that can be hard to clean. To save time and keep your baking sheet looking fresh, line it with a layer of foil before you apply the cooking spray.
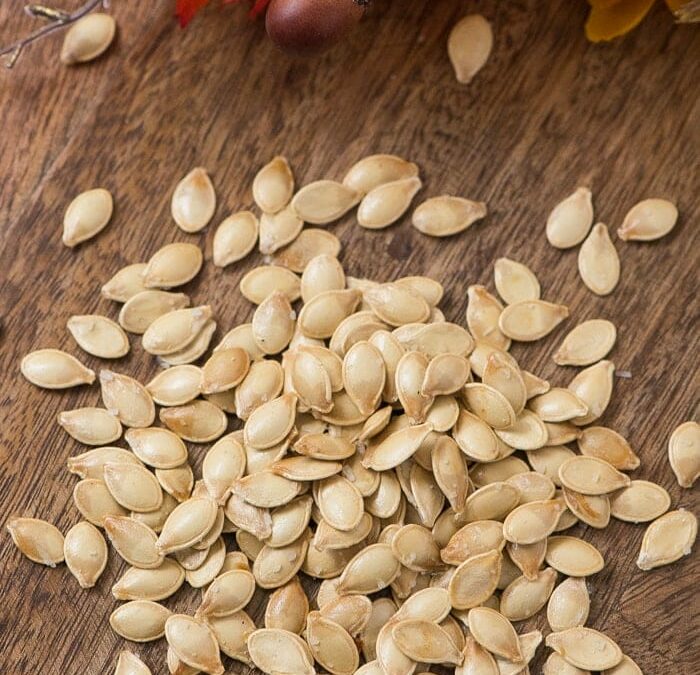
When you prepare spaghetti squash, don’t throw away the seeds! You can roast them into a crunchy, healthy snack—just like roasting pumpkin seeds. The seasoning mix in this recipe is a mix of spicy, salty and sweet, but feel free to experiment with your own flavor combinations.”
Ingredients
½ cup spaghetti squash seeds (from 2 medium squash; see Tip)
½ teaspoon extra-virgin olive oil
1 teaspoon maple syrup
½ teaspoon ground cumin
½ teaspoon ground cinnamon
⅛ teaspoon kosher salt
Directions
1Preheat oven to 300°F. Line a rimmed baking sheet with parchment paper.
2Toss spaghetti squash seeds with oil, maple syrup, cumin, cinnamon and salt in a small bowl. Spread on the prepared baking sheet in an even layer. Bake for 15 minutes. Stir the seeds and continue baking until golden and crispy, 10 to 15 minutes.
Tip: To harvest seeds from a spaghetti squash, scoop out the inside of the squash. Separate the seeds from the flesh as well as you can, then place the seeds in a bowl of water. Use your hands to swish the seeds around to loosen any remaining flesh or strings. The seeds will float, so you can remove them with a spoon or your fingers. Drain the seeds on a dry dish towel or a plate lined with paper towels; pat dry with paper towels.
To make ahead: Store in an airtight container for up to 3 days.
These buttery thyme-seasoned knotted dinner rolls have a sweet and tangy cranberry-ginger topping baked right in. The prep time is only 20 minutes thanks to frozen whole-wheat bread dough, so you can make these any night of the week.”
Ingredients
¼ cup fresh cranberries, chopped
1½ teaspoons sugar or sugar substitute (see Tip) equivalent to 1½ teaspoons sugar
1Combine cranberries and sugar in a small bowl. Stir in 1 tablespoon of the melted butter, ¼ teaspoon of the thyme and the ginger.
2Line a baking sheet with parchment paper. Dust work surface lightly with flour. Divide dough into 12 equal pieces. Roll each piece of dough into a 12-inch-long rope. Tie each dough rope into a loose knot, leaving two long ends. Tuck top end under knot and bottom end into top center of the knot. Spoon 1 teaspoon of the cranberry mixture into the center of each knot. Place knots 2 to 3 inches apart on prepared baking sheets. Cover and let rise in a warm place until nearly double in size (30 to 60 minutes).
3Preheat oven to 350°F. Stir together the remaining 1 tablespoon melted butter and the remaining ¼ teaspoon thyme in a small bowl. Brush butter-thyme mixture over tops of rolls. Bake about 18 minutes or until golden brown.
Tip: If using a sugar substitute, we recommend Splenda(R) Granular or Truvia(R) Spoonable Sweetener. Follow package directions to use product amount equivalent to 1½ teaspoons sugar. Nutrition Per Servings with Substitute: same as below, except 116 calories, 18 g carbohydrate, 0 g sugar.
Skip kneading or mixing when you start with prepared pizza dough in this healthy homemade breadstick recipe. This recipe calls for chives and garlic, but try your favorite toppings to personalize. For a crispier texture more like grissini, roll the breadsticks long and thin and bake until golden.”
Ingredients
1 pound pizza dough, preferably whole-wheat (see Tip)
1½ tablespoons extra-virgin olive oil
3 tablespoons dried chives
1 tablespoon garlic powder
Directions
1Arrange racks in upper and lower thirds of oven; preheat to 400°F. Line 2 baking sheets with parchment paper or coat with cooking spray.
2Divide dough into 16 equal pieces and roll each into a 12- to 14-inch-long breadstick on a lightly floured surface. Place the breadsticks at least ½ inch apart on the baking sheets. Brush with oil and sprinkle with chives and garlic powder, pressing if necessary to help it stick.
3Bake the breadsticks on the upper and lower racks, switching the pans halfway through, until lightly brown, 15 to 20 minutes. Transfer to wire racks to cool.
Tips: Look for balls of prepared whole-wheat pizza dough at your supermarket, fresh or frozen and without any hydrogenated oils.
If your dough “resists” being rolled out, let it rest 10 to 15 minutes, then try rolling it out again.
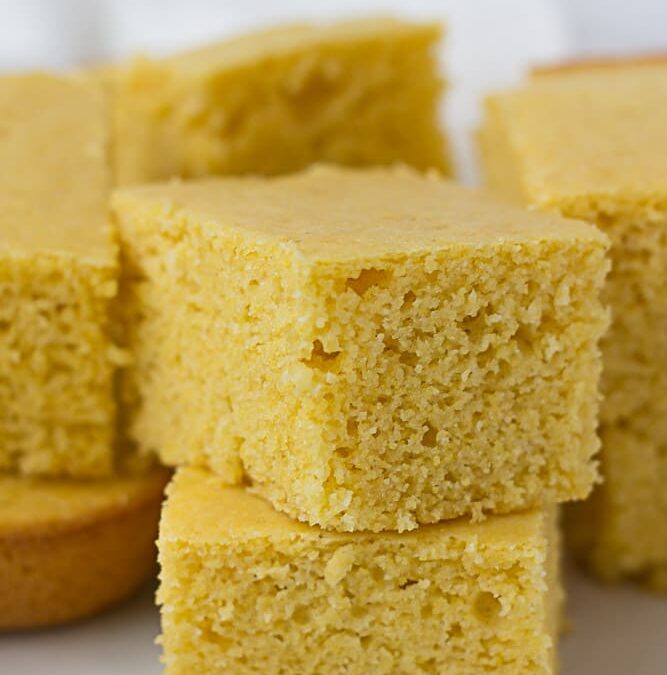
Classic cornbread can easily be made vegan with delicious results by replacing the egg and dairy milk with flaxseed meal and soymilk! Serve this easy recipe as a side with vegan chili or turn it into vegan cornbread stuffing.”
Ingredients
5 tablespoons water
2 tablespoons flaxseed meal
1¼ cups whole-grain cornmeal
¾ cup white whole-wheat flour
2 tablespoons sugar
1 teaspoon baking powder
½ teaspoon salt
¾ cup unsweetened plain soymilk
3 tablespoons avocado oil or canola oil
Directions
1Preheat oven to 350°F. Coat an 8-inch-square baking dish with cooking spray.
2Combine water and flaxseed meal in a small bowl. Let stand until thickened, 3 to 5 minutes.
3Combine cornmeal, flour, sugar, baking powder and salt in a medium bowl. Whisk soymilk, oil and the reserved flaxseed mixture in another medium bowl; add to the dry ingredients and stir until combined. Transfer batter to the baking dish, spreading evenly. Bake until the top is golden brown and a toothpick inserted in the center comes out clean, 25 to 30 minutes. Let cool for at least 10 minutes before serving.
To make ahead: Store, well-wrapped, at room temperature for up to 2 days or in the freezer for up to 2 months.


Recent Comments